Month: February 2024

Epoxy Garage Floor Cost: Budgeting and Planning Tips – The Garage Floor Company

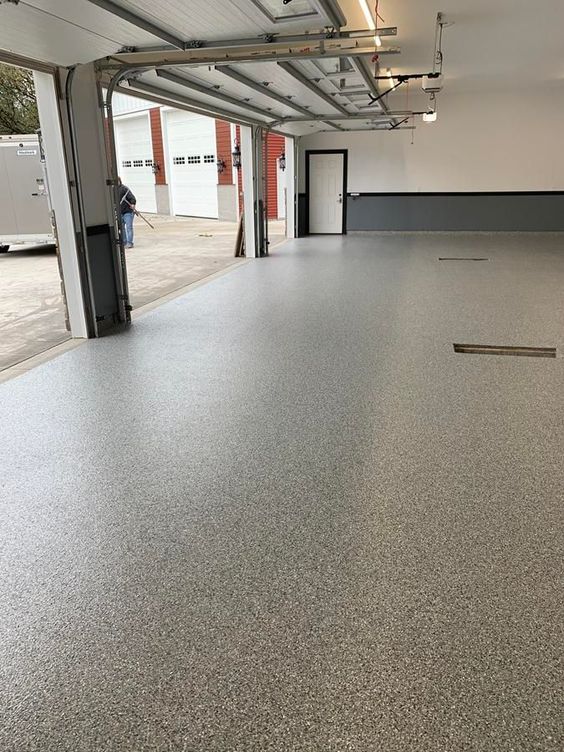
Embarking on the journey to upgrade my garage flooring with epoxy coating was an exciting yet budget-conscious decision. Like many homeowners, I wanted to enhance the durability, aesthetics, and value of my garage space without breaking the bank. As I delved into researching the costs associated with epoxy garage flooring, I discovered that careful budgeting and planning are essential for achieving a successful and affordable outcome.

In this article, as per Epoxy Garage Floor, I’ll share my personal insights and tips for budgeting and planning for epoxy garage floor costs, based on my own experiences and research.

  1. Understanding the Cost Factors: Before diving into budgeting and planning, it’s essential to understand the various factors that contribute to the overall cost of epoxy garage flooring. These factors include the size of the garage, the condition of the existing floor, the type and quality of epoxy coating chosen, any additional features or customization options, and whether professional installation is required. By identifying these cost factors upfront, you can develop a realistic budget and avoid unexpected expenses along the way.
  2. Setting a Realistic Budget: Setting a realistic budget is the first step in the budgeting and planning process for epoxy garage flooring. Take the time to assess your financial situation and determine how much you’re willing to invest in the project. Consider factors such as your overall home improvement budget, the importance of the garage in your daily life, and the long-term benefits of epoxy flooring. Remember to factor in not only the cost of materials but also any additional expenses such as tools, equipment, and labor.
  3. Researching Cost Estimates: Researching cost estimates is crucial for gaining a better understanding of the average costs associated with epoxy garage flooring in your area. Reach out to local suppliers, contractors, or epoxy flooring companies to request quotes or estimates based on the size and specifications of your garage. Additionally, utilize online resources and forums to gather information and insights from other homeowners who have completed similar projects. Comparing multiple quotes will help you identify competitive pricing and make informed decisions.
  4. Comparing Different Epoxy Coating Options: Epoxy coatings come in a variety of formulations, each with its own price point and features. When budgeting for epoxy garage flooring, it’s essential to compare different coating options and assess their cost-effectiveness based on factors such as durability, aesthetics, and maintenance requirements. While premium-grade epoxy coatings may have a higher upfront cost, they often offer better long-term value in terms of durability and performance, ultimately saving you money on repairs and replacements down the line.
  5. Considering DIY vs. Professional Installation: Another important consideration when budgeting for epoxy garage flooring is whether to tackle the installation as a DIY project or hire a professional contractor. DIY installation can save money on labor costs but requires time, effort, and skill to achieve professional-quality results. On the other hand, professional installation offers convenience and expertise but comes with additional labor expenses. Assess your DIY skills, available time, and budget constraints to determine the most cost-effective approach for your specific situation.
  6. Accounting for Additional Expenses: In addition to the cost of materials and labor, it’s essential to account for any additional expenses that may arise during the epoxy garage flooring project. These expenses may include surface preparation materials, such as cleaning agents, etching solutions, and repair kits, as well as tools and equipment needed for application, such as rollers, brushes, and mixing containers. By budgeting for these additional expenses upfront, you can avoid unexpected costs and ensure a smoother project experience.
  7. Planning for Long-Term Maintenance: When budgeting for epoxy garage flooring, it’s essential to consider the long-term maintenance costs associated with upkeep and preservation. While epoxy coatings are known for their durability and low maintenance requirements, periodic resealing may be necessary to maintain the finish and extend its lifespan. Factor in the cost of sealants or topcoat products, as well as any ongoing maintenance tasks such as cleaning and spot repairs, to ensure that your budget remains manageable over time.
  8. Exploring Financing Options: If budget constraints are a concern, exploring financing options can help make epoxy garage flooring more affordable and accessible. Many suppliers and contractors offer flexible financing plans or payment options to accommodate different budgets and financial situations. Additionally, consider leveraging rewards programs, discounts, or promotional offers to offset costs and maximize savings. By exploring financing options, you can make epoxy garage flooring a feasible investment within your budgetary constraints.

In conclusion, as per Epoxy Garage Floor, budgeting and planning for epoxy garage flooring requires careful consideration of various factors, including cost estimates, coating options, installation methods, additional expenses, and long-term maintenance. By setting a realistic budget, researching cost estimates, comparing coating options, considering DIY vs. professional installation, accounting for additional expenses, planning for long-term maintenance, and exploring financing options, you can achieve a successful and affordable epoxy garage flooring project that enhances the durability, aesthetics, and value of your garage space. With careful budgeting and planning, you can transform your garage into a functional, stylish, and long-lasting space that you can enjoy for years to come.

The Garage Floor Company

866-507-0096

Garage Door Spring Replacement: A Guide for 2024 – Southern Home Creations Garage Doors & Openers

As a homeowner, I’ve encountered various maintenance tasks and repairs over the years, but one of the most intimidating ones was replacing the garage door springs. The garage door springs play a critical role in the smooth operation of the door, and when they malfunction or break, it can be both frustrating and potentially dangerous. However, armed with research and the right knowledge, I embarked on the journey of replacing my garage door springs.

In this comprehensive guide for 2024, I’ll share my experience and provide a step-by-step walkthrough to help you tackle this task safely and effectively as stated in Garage Door Repair.

Understanding the Importance of Garage Door Springs:

Before delving into the replacement process, it’s essential to understand the role that garage door springs play. Garage door springs are responsible for counterbalancing the weight of the door, making it easier to open and close manually or with the assistance of a garage door opener. There are two main types of garage door springs: torsion springs, which are mounted above the door, and extension springs, which are located on either side of the door. Both types of springs are under high tension and can be dangerous to work with if mishandled.

Signs that Garage Door Springs Need Replacement:

Recognizing the signs of failing garage door springs is crucial for addressing issues promptly and avoiding potential safety hazards. Some common signs that indicate it’s time to replace the garage door springs include:

  1. The door is difficult to open or close.
  2. The door operates unevenly or jerks during operation.
  3. Visible signs of wear or damage on the springs, such as rust or corrosion.
  4. Loud noises or squeaking coming from the springs during operation.
  5. The door fails to stay in the open or closed position.

If you notice any of these signs, it’s essential to address the issue promptly to prevent further damage to the door and ensure the safety of everyone in the vicinity.

Preparing for Garage Door Spring Replacement:

Before starting the replacement process, it’s crucial to gather the necessary tools and equipment and take proper safety precautions. Here’s what you’ll need:

  1. Replacement springs: Purchase high-quality replacement springs that are compatible with your garage door model and size. It’s essential to match the new springs’ specifications to the old ones to ensure proper operation.
  2. Safety goggles: Protect your eyes from debris and spring tension by wearing safety goggles throughout the replacement process.
  3. Work gloves: Wear sturdy work gloves to protect your hands from sharp edges and prevent injury.
  4. Winding bars: Use winding bars to safely wind and unwind the tension on the springs.
  5. Ladder: Use a sturdy ladder to reach the springs safely, especially if they’re located above the door.
  6. Clamp or vice grips: Secure the door in the open position to prevent it from falling during spring replacement.
  7. Ratchet and sockets: Use a ratchet and sockets to loosen and tighten bolts and hardware as needed.

Additionally, it’s essential to review the manufacturer’s instructions for your specific garage door model and consult with a professional if you’re unsure about any aspect of the replacement process.

Step-by-Step Guide to Garage Door Spring Replacement:

  1. Disconnect the power: Before starting any work on the garage door springs, disconnect power to the door opener to prevent accidental activation.
  2. Secure the door: Use a clamp or vice grips to secure the garage door in the open position. This prevents the door from closing unexpectedly while you’re working on the springs.
  3. Identify the type of springs: Determine whether your garage door has torsion springs or extension springs. Torsion springs are typically mounted above the door, while extension springs are located on either side of the door.
  4. Release tension on the springs: Use winding bars to release tension on the springs safely. Insert the winding bars into the winding cones on the springs and slowly unwind them until there is no tension on the springs.
  5. Remove the old springs: Once the tension is released, carefully remove the old springs from their mounting brackets. Be cautious as you remove the springs, as they may still have residual tension.
  6. Install the new springs: Install the new springs in place of the old ones, making sure they are securely attached to the mounting brackets. Follow the manufacturer’s instructions for proper installation and orientation of the springs.
  7. Wind the new springs: Use winding bars to wind the new springs and apply tension to them. Again, follow the manufacturer’s instructions for the correct number of turns and winding direction.
  8. Test the door: After installing and tensioning the new springs, carefully lower the door and test its operation. Ensure that the door opens and closes smoothly and evenly, without any jerking or sticking.
  9. Reconnect the power: Once you’re satisfied with the door’s operation, reconnect power to the door opener and test it again to ensure everything is working correctly.
  10. Perform regular maintenance: To extend the lifespan of your new springs and ensure continued smooth operation of the garage door, perform regular maintenance tasks such as lubricating moving parts and inspecting for signs of wear or damage.

Conclusion:

In summary, based from Garage Door Repair, replacing garage door springs is a challenging task that requires careful attention to detail and adherence to safety protocols. By following the step-by-step guide outlined above and taking proper precautions, you can successfully replace your garage door springs and restore the door’s functionality safely. However, if you’re uncomfortable or unsure about any aspect of the replacement process, it’s always best to consult with a professional garage door technician for assistance. With the right tools, knowledge, and preparation, you can tackle garage door spring replacement with confidence and ensure the safety and security of your home.

Southern Home Creations Garage Doors & Openers

4110 Tench Rd Suite D, Suwanee, GA 30024, United States

770-831-0301

How to Open a Garage Door with a Broken Spring Safely and Effectively – First Responder Garage Doors

Encountering a broken spring on my garage door was a scenario I never anticipated as a homeowner. Suddenly, my seemingly routine departure for work turned into a moment of frustration and confusion. With the door refusing to budge, I faced the daunting task of figuring out how to open it safely without exacerbating the problem. Through careful research, guidance from professionals, and trial and error, I successfully navigated this challenge.

In this guide, I’ll share my firsthand experience, practical insights, and step-by-step instructions for opening a garage door with a broken spring by following Garage Door Repair Southlake TX.

Understanding the Importance of Safety:

Before attempting to open a garage door with a broken spring, it’s crucial to prioritize safety above all else. A broken spring can cause the door to become unbalanced and unpredictable, posing a significant risk of injury or property damage if mishandled. By taking the necessary precautions and following proper procedures, you can minimize the risks and safely address the issue.

Tools and Preparations:

Gathering the right tools and making necessary preparations is essential for a successful and safe operation:

  • Sturdy step ladder or platform
  • Vice grips or locking pliers
  • C-clamps or locking clamps
  • Protective gloves and eyewear
  • Assistance from a trusted individual if available

Step-by-Step Guide to Opening a Garage Door with a Broken Spring:

  1. Secure the Door: Begin by ensuring the garage door is securely closed to prevent it from unexpectedly opening or falling during the repair process. If necessary, use c-clamps or locking clamps to secure the door in place.
  2. Release Emergency Disconnect Cord: Locate the emergency disconnect cord or handle attached to the garage door opener mechanism. Pull down on the cord to disengage the opener from the door, allowing you to manually open and close it.
  3. Open the Door Partially: Using a sturdy step ladder or platform for support, carefully lift the garage door manually by gripping the bottom edge and lifting slowly and evenly. Avoid putting excessive strain on the door and be prepared to support its weight as it opens.
  4. Secure the Door in the Open Position: Once the door is partially open, use vice grips or locking pliers to secure the bottom section of the door to the tracks on each side. This will prevent the door from sliding back down while you work on the broken spring.
  5. Seek Professional Assistance: With the door secured in the open position, it’s essential to seek professional assistance from a qualified garage door technician. Attempting to repair or replace a broken spring without the proper knowledge and equipment can be dangerous and may result in further damage or injury.

Tips for Ensuring Safety and Success:

  • Never attempt to repair or replace a broken garage door spring yourself unless you have the necessary skills, experience, and equipment. Garage door springs are under extreme tension and can cause serious injury or death if mishandled.
  • Avoid operating the garage door opener with a broken spring, as this can place additional strain on the opener mechanism and potentially cause further damage.
  • Always follow the manufacturer’s instructions and safety guidelines when performing any maintenance or repairs on your garage door system.
  • Regularly inspect your garage door springs for signs of wear or damage and replace them promptly if necessary to prevent unexpected failures.

Conclusion:

Overall, based from Garage Door Repair Southlake TX, encountering a broken spring on your garage door can be a stressful and challenging situation, but with the right approach and precautions, you can safely address the issue and restore functionality to your door. By following the steps outlined in this guide and seeking professional assistance when needed, you can navigate this challenge with confidence and peace of mind. Remember, safety should always be your top priority when dealing with garage door repairs, and when in doubt, don’t hesitate to seek help from a qualified professional.

First Responder Garage Doors

180 State St Suite 225, Southlake, TX 76092, United States

817-991-5551

How Wide is a Two-Car Garage Door? – Dynamo Overhead Garage Doors LLC

As a homeowner contemplating home renovations and upgrades, the dimensions of a two-car garage door have been a critical consideration in my planning process. Understanding these dimensions is crucial for ensuring that the garage door not only accommodates the vehicles but also allows for ease of access and functionality.

By following Garage Door Repair, I’ll share my firsthand exploration into the width of a two-car garage door, offering insights into standard dimensions, variations, and factors to consider when selecting the right size for your garage.

  1. Standard Width of a Two-Car Garage Door: The standard width of a two-car garage door typically ranges from 16 to 18 feet. This width is designed to accommodate two standard-sized vehicles side by side with sufficient clearance for entry and exit. However, it’s essential to note that the exact width may vary depending on factors such as regional building codes, architectural preferences, and the specific needs of the homeowner.
  2. Factors Influencing Garage Door Width: Several factors can influence the width of a two-car garage door, including:
    • Vehicle Size: The width of the garage door should be large enough to comfortably accommodate the vehicles intended for use. This includes not only standard-sized cars but also larger vehicles such as trucks, SUVs, or vans.
    • Storage Needs: Consideration should be given to any additional storage requirements within the garage, such as shelving units, workbenches, or recreational equipment. The width of the garage door should allow for adequate clearance to access these items without obstruction.
    • Architectural Style: The width of the garage door should complement the overall architectural style of the home. It should be proportionate to the size and scale of the property, ensuring visual harmony and aesthetic appeal.
    • Accessibility: The width of the garage door should facilitate ease of access for both vehicles and occupants. This includes ensuring sufficient clearance for opening car doors and maneuvering in and out of the garage space comfortably.
    • Future Needs: Anticipating future needs and potential changes, such as acquiring larger vehicles or converting part of the garage for additional living space, can help determine the appropriate width for the garage door.
  3. Common Variations in Garage Door Width: While the standard width of a two-car garage door falls within the 16 to 18-foot range, there are variations available to accommodate different preferences and requirements:
    • Narrower Doors: Some homeowners may opt for narrower garage doors, particularly in cases where space constraints or architectural limitations are a factor. Narrower doors, such as those measuring 14 or 15 feet in width, can still accommodate two vehicles but may provide less clearance and maneuvering space.
    • Wider Doors: Conversely, other homeowners may choose to install wider garage doors, exceeding the standard 18-foot width. Wider doors, such as those measuring 20 or 24 feet in width, offer additional space for larger vehicles or enhanced accessibility and functionality.
    • Custom Sizes: For homeowners with unique needs or preferences, custom-sized garage doors can be fabricated to fit specific dimensions. Customization allows for greater flexibility in tailoring the garage door width to suit individual requirements and design preferences.
  4. Selecting the Right Width for Your Garage Door: When selecting the width of a two-car garage door, it’s essential to consider the following factors:
    • Measure the Vehicles: Measure the width of the vehicles that will be parked in the garage to ensure that they will fit comfortably within the available space. Allow for additional clearance on either side to accommodate opening car doors and maneuvering within the garage.
    • Consider Future Needs: Anticipate any changes or additions that may impact the width requirements of the garage door in the future. This could include acquiring larger vehicles, expanding the garage space, or converting part of the garage for alternative use.
    • Consult with Professionals: Seek guidance from garage door professionals or architects who can provide expert advice and recommendations based on your specific needs and circumstances. They can help assess the available space, recommend suitable door widths, and assist with the selection and installation process.
  5. Conclusion: In conclusion, according to Garage Door Repair, the width of a two-car garage door plays a crucial role in determining the functionality, accessibility, and aesthetics of the garage space. Understanding standard dimensions, variations, and factors influencing garage door width is essential for selecting the right size to accommodate vehicles, storage needs, architectural style, and future requirements. By carefully considering these factors and consulting with professionals, homeowners can ensure that their garage door meets their needs and enhances the overall functionality and value of their home.

Dynamo Overhead Garage Doors LLC

Conroe, TX

832-270-3373

How to Fix Gap on One Side of Garage Door – Denzels Garage Doors

As a homeowner, few things are more frustrating than discovering a gap on one side of your garage door. Not only does it compromise the security and aesthetics of your home, but it can also lead to energy loss, water damage, and pest intrusion. Fortunately, I’ve encountered this issue firsthand and learned some effective solutions along the way.

In this comprehensive guide from Garage Door Repair Marina del Rey CA, I’ll share my experience and provide step-by-step instructions on how to fix a gap on one side of your garage door, restoring both functionality and peace of mind.

  1. Diagnosing the Problem:Before diving into solutions, it’s crucial to identify the root cause of the gap. Common culprits include:
    • Misaligned tracks: If the tracks on one side of the garage door are out of alignment, it can cause the door to sit unevenly and create a gap.
    • Worn weatherstripping: Over time, the weatherstripping along the bottom or sides of the garage door may deteriorate or become damaged, allowing air, water, and pests to enter.
    • Warped door panels: Warping or bowing of the garage door panels can cause uneven gaps to form along the sides or bottom of the door.
    • Loose or damaged hardware: Loose hinges, rollers, or cables can cause the door to shift out of alignment and create gaps.
    By carefully inspecting the garage door and surrounding components, you can determine the underlying issue and choose the appropriate solution.
  2. Adjusting the Tracks:If misaligned tracks are causing the gap, follow these steps to realign them:
    1. Use a level to determine if the tracks are plumb and parallel to each other.
    2. Loosen the mounting bolts securing the tracks to the wall or ceiling.
    3. Gently tap the misaligned track with a rubber mallet to adjust its position.
    4. Use the level to ensure that the tracks are properly aligned, then tighten the mounting bolts securely.
    5. Test the garage door’s movement to ensure that it operates smoothly along the realigned tracks.
    Proper track alignment is essential for the smooth and reliable operation of the garage door, so take your time to ensure that the tracks are adjusted correctly.
  3. Replacing Weatherstripping:If worn or damaged weatherstripping is causing the gap, follow these steps to replace it:
    1. Measure the length of the gap along the bottom or sides of the garage door.
    2. Purchase a replacement weatherstripping kit or individual weatherstrips that match the dimensions of the gap.
    3. Remove the old weatherstripping by pulling it away from the door or track.
    4. Clean the surface of the door or track where the new weatherstripping will be installed to ensure proper adhesion.
    5. Cut the replacement weatherstripping to size using scissors or a utility knife.
    6. Align the weatherstripping along the bottom or sides of the garage door, pressing it firmly into place to create a tight seal.
    7. Test the garage door’s movement to ensure that the new weatherstripping does not interfere with its operation.
    Quality weatherstripping provides an effective barrier against drafts, moisture, and pests, so be sure to choose a durable and weather-resistant material for long-lasting results.
  4. Repairing Warped Door Panels:If warped door panels are causing the gap, follow these steps to repair or reinforce them:
    1. Inspect the door panels for signs of warping, bowing, or damage.
    2. Use a heat gun or hairdryer to apply heat to the warped areas of the door panels.
    3. Use clamps or weights to hold the warped panels in place while they cool and regain their shape.
    4. If necessary, reinforce the door panels with additional bracing or supports to prevent future warping.
    5. Test the garage door’s movement to ensure that the repaired panels do not impede its operation.
    Proper reinforcement and support can help prevent further warping and ensure that the garage door maintains a tight seal along its edges.
  5. Inspecting and Repairing Hardware:If loose or damaged hardware is causing the gap, follow these steps to inspect and repair it:
    1. Inspect the hinges, rollers, cables, and other hardware for signs of wear, damage, or looseness.
    2. Tighten any loose bolts, screws, or nuts using the appropriate tools.
    3. Replace any damaged or worn hardware components with new ones.
    4. Lubricate the moving parts of the garage door system, including hinges, rollers, and tracks, to ensure smooth operation.
    5. Test the garage door’s movement to ensure that the repaired hardware does not affect its operation.
    Proper maintenance and repair of hardware components are essential for the safe and reliable operation of the garage door, so be sure to address any issues promptly.
  6. Final Inspection and Testing:Once you’ve addressed the underlying cause of the gap, perform a final inspection and testing of the garage door to ensure that it operates smoothly and seals tightly:
    • Close the garage door and visually inspect the edges and bottom for any gaps or gaps.Test the garage door’s movement several times using the opener remote or wall-mounted switch, paying attention to any unusual noises or signs of strain.Open and close the garage door manually to ensure that it moves smoothly along its tracks and seals tightly against the floor and sides.
    By performing a thorough inspection and testing, you can verify that the gap has been effectively addressed and the garage door operates as intended.

Conclusion

Overall, based from Garage Door Repair Marina del Rey CA, fixing a gap on one side of a garage door may seem like a daunting task, but with the right approach and attention to detail, it can be resolved quickly and effectively. By identifying the underlying cause of the gap and choosing the appropriate solution, you can restore both functionality and aesthetics to your garage door, ensuring that it provides reliable protection and convenience for years to come. Whether you’re a seasoned DIY enthusiast or a first-time homeowner, mastering the art of garage door repair is a valuable skill that will serve you well in maintaining your home’s functionality and curb appeal.

Denzels Garage Doors

Marina del Rey, CA

619-496-9419

Understanding the Costs of Garage Door Openers: A Comprehensive Guide – Camco Commercial Door Company

As a homeowner, one of the most critical components of your property’s security and functionality is your garage door opener. However, when it comes time to replace or upgrade your garage door opener, navigating the costs can be daunting.

In this guide from Garage Door Repair Knoxville TN, I’ll delve into the various factors influencing the price of a new garage door opener and provide valuable insights to help you make an informed decision.

Understanding Garage Door Opener Basics: Before delving into the costs, it’s essential to understand the basics of garage door openers. These devices consist of a motorized mechanism that facilitates the opening and closing of your garage door. There are several types of garage door openers, including chain-drive, belt-drive, screw-drive, and direct-drive, each offering unique features and performance levels.

Factors Influencing Garage Door Opener Costs:

  1. Type of Opener:
    • Chain-Drive: Known for their durability and affordability, chain-drive openers are typically the most budget-friendly option.
    • Belt-Drive: These openers offer quieter operation compared to chain-drive models and are often priced slightly higher due to their smoother performance.
    • Screw-Drive: Offering robust performance with fewer moving parts, screw-drive openers fall within the mid-range price category.
    • Direct-Drive: With a sleek design and ultra-quiet operation, direct-drive openers are among the highest-priced options but offer superior reliability and minimal maintenance.
  2. Horsepower (HP) Rating:
    • Garage door openers are available in different horsepower ratings, ranging from ⅓ HP to 1 ¼ HP. Higher horsepower models are typically more expensive and are suitable for heavier garage doors or frequent use.
  3. Features and Technology:
    • Advanced features such as Wi-Fi connectivity, battery backup systems, motion-activated lighting, and smartphone control capabilities contribute to the overall cost of a garage door opener.
  4. Brand and Manufacturer:
    • Established brands with a reputation for quality and reliability may command higher prices than lesser-known brands. However, investing in a reputable brand often translates to greater durability and long-term performance.
  5. Installation Costs:
    • Professional installation services incur additional costs, which vary depending on factors such as labor rates, complexity of installation, and geographical location.

Average Costs of Garage Door Openers:

  • Chain-Drive Openers: $150 – $300
  • Belt-Drive Openers: $200 – $500
  • Screw-Drive Openers: $250 – $500
  • Direct-Drive Openers: $300 – $700

Tips for Cost-Effective Purchases:

  1. Assess Your Needs: Determine the specific requirements of your garage door, such as size, weight, and usage frequency, to select an opener that meets your needs without overspending.
  2. Consider Long-Term Value: While it may be tempting to opt for the cheapest option upfront, investing in a high-quality opener from a reputable brand can save you money in the long run by reducing maintenance and repair costs.
  3. Research and Compare: Take the time to research different models, read customer reviews, and compare prices from multiple retailers or contractors to ensure you’re getting the best value for your money.
  4. Explore Financing Options: If upfront costs are a concern, inquire about financing options or promotional deals offered by manufacturers or retailers to make your purchase more affordable.

Conclusion:

According to Garage Door Repair Knoxville TN, choosing the right garage door opener involves considering various factors, including type, horsepower, features, brand reputation, and installation costs. By understanding these factors and conducting thorough research, you can confidently select a garage door opener that fits your budget and provides reliable performance for years to come. Remember, investing in quality upfront can save you time, money, and hassle down the road.

Camco Commercial Door Company

Knoxville, TN

865-776-9455

A Step-by-Step Guide to Reconnecting Your Garage Door – Brothers Garage Door Service

Few things are more frustrating than finding yourself unable to open or close your garage door. Whether due to a power outage, a malfunctioning opener, or other issues, being unable to access your garage can disrupt your routine and cause inconvenience. Fortunately, reestablishing the connection and getting your garage door back on track is often simpler than you might think.

In this guide based from Garage Door Repair Livonia MI, I’ll walk you through the step-by-step process of reconnecting your garage door, ensuring smooth operation and restoring convenience to your daily life.

Step 1: Identify the Issue Before you begin the reconnection process, it’s essential to diagnose the problem accurately. Determine whether the issue lies with the power supply, the garage door opener, or another component. Check for any visible signs of damage or malfunction, such as loose wires, tripped circuit breakers, or worn-out parts.

Step 2: Restore Power If the garage door isn’t responding at all, the first step is to ensure that power is reaching the opener. Check the power source, such as the electrical outlet or the breaker panel, to ensure it’s functioning correctly. If necessary, reset any tripped breakers or replace blown fuses. Once power is restored, test the opener to see if it responds.

Step 3: Inspect the Opener If power isn’t the issue, inspect the garage door opener for any visible signs of damage or malfunction. Check the motor unit for loose wires, damaged components, or debris that may be obstructing its operation. Ensure that the opener is securely mounted to the ceiling and that all connections are tight and secure.

Step 4: Reset the Opener Many garage door openers feature a reset button that can help troubleshoot connectivity issues. Locate the reset button on the opener, typically found near the motor unit, and press it to reset the device. Hold the button for a few seconds until you see a response from the opener, such as a flashing light or a clicking sound.

Step 5: Reestablish the Connection If resetting the opener doesn’t resolve the issue, you may need to reestablish the connection between the opener and the garage door. This typically involves synchronizing the opener with the door’s mechanism to ensure smooth operation. Follow the manufacturer’s instructions for your specific opener model to reprogram or reconfigure the device as needed.

Step 6: Test the Door Once you’ve completed the reconnection process, it’s crucial to test the garage door to ensure that it’s functioning correctly. Stand within range of the opener and use the remote or wall-mounted keypad to open and close the door. Pay attention to any unusual noises or movements that may indicate underlying issues.

Step 7: Perform Regular Maintenance To prevent future connectivity issues and ensure smooth operation, it’s essential to perform regular maintenance on your garage door and opener. Keep the tracks clean and free of debris, lubricate moving parts as needed, and inspect the door for signs of wear or damage. By staying proactive with maintenance, you can avoid unexpected disruptions and prolong the lifespan of your garage door system.

Conclusion

Overall, according to Garage Door Repair Livonia MI, reconnecting a garage door may seem like a daunting task, but with the right approach, it’s often a straightforward process that can be completed quickly and easily. By following these step-by-step instructions and taking proactive measures to maintain your garage door system, you can ensure reliable operation and regain access to your garage with confidence.

Brothers Garage Door Service

29522 Wentworth St, Livonia, MI 48154, United States

734-292-0971

How to Reset Your Garage Door Keypad Pin Number – Affordable Garage Door Repairs of Indianapolis, LLC

As a homeowner, I know how frustrating it can be when you forget your garage door keypad PIN or need to change it for security reasons. Fortunately, resetting your garage door keypad PIN is a simple process that you can easily do yourself.

In this comprehensive guide, I’ll walk you through the steps to reset your garage door keypad PIN, allowing you to regain access to your garage quickly and easily by following Garage Door Repair.

Step 1: Locate Your Garage Door Opener Motor Unit

The first step in resetting your garage door keypad PIN is to locate the motor unit of your garage door opener. This unit is typically installed on the ceiling of your garage near the center of the door and contains the programming button needed to reset your keypad PIN.

Step 2: Access the Programming Button

Once you’ve located the motor unit, you’ll need to access the programming button. This button is often located near the antenna wire and may be labeled as “Learn,” “Program,” or “Set.” Pressing this button puts the opener into programming mode, allowing you to reset the keypad PIN.

Step 3: Clear the Existing PIN

To clear the existing PIN from your garage door keypad, follow these steps:

  1. Press and release the programming button on the motor unit. The indicator light on the unit will illuminate, indicating that it’s ready to receive a new PIN.
  2. Within 30 seconds, enter the current PIN on your keypad and press the “Enter” or “Send” button. This action clears the existing PIN from the keypad’s memory.

Step 4: Enter a New PIN

With the existing PIN cleared, you can now enter a new PIN of your choice. Follow these steps to enter a new PIN:

  1. Enter a new four-digit PIN of your choice using the keypad on your garage door opener. Make sure to choose a PIN that is easy for you to remember but difficult for others to guess.
  2. After entering the new PIN, press the “Enter” or “Send” button on the keypad to confirm your selection.

Step 5: Test the New PIN

Once you’ve entered the new PIN, it’s essential to test it to ensure that it’s working correctly. Close the garage door if it’s open and then enter the new PIN followed by the “Enter” or “Send” button on the keypad. If the PIN is accepted, the door should open, indicating that the reset was successful.

Step 6: Secure the Motor Unit

After resetting your garage door keypad PIN, it’s crucial to secure the programming button on the motor unit to prevent unauthorized access to your garage. This can typically be done by pressing the button again to exit programming mode or by using a small screwdriver to cover or disable the button.

Step 7: Keep Your New PIN Secure

Now that you’ve successfully reset your garage door keypad PIN, it’s essential to keep your new PIN secure to prevent unauthorized access to your garage. Avoid sharing your PIN with others and consider changing it periodically for added security.

In conclusion, as per Garage Door Repair, resetting your garage door keypad PIN is a simple process that you can easily do yourself with just a few basic steps. By following the instructions outlined in this guide, you can quickly and effectively reset your keypad PIN and regain access to your garage. With your new PIN in place, you can enjoy peace of mind knowing that your garage is secure and protected.

Affordable Garage Door Repairs of Indianapolis, LLC

Indianapolis, IN

317-372-5337

Powered by WordPress & Theme by Anders Norén